ShopDreamUp AI ArtDreamUp
Deviation Actions


Suggested Deviants


Suggested Collections


Description
For ~DjSamerA 
Photoshop pseudo-tutorial, or rather expalantion how I made Planar Crossing [link] - really easy thing, it was not complicated photomanipulation. Just cutting images and adjusting colours.
If you download the thing, you will see animated gif. I made it just for fun ^^ The real tutorial is in text mode. I have Polish version of Photoshop, so if I translated names of the tools improperly, please let me know!
Also, I feel ill today, so pardon my mistakes.
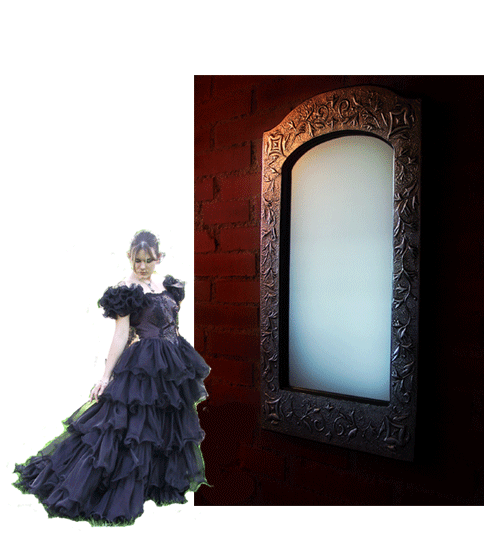
1. Choose File->New Image and enter size. I worked on 2600 x 2900, but it’s absolutely not recommended, even if you have 2 GB RAM. 1600 x 1800 would be wiser choice.
2. Paste the lady and mirror so that basic layout is designed.
3. Paste upper part of mirror and use distortion to make it match other part. [link]
4. Paste the mask and landscape inside the mirror. Use ctrl+x, eraser, mask and radial gradient and smudge to cut off background and make the edges smooth. Stamp (cloning?) is good for repairing the image if you happened to erase too much.
5. Do the same with upper part of mirror.
6. Cut off unnecessary parts of landscape and change layers order to get a rough sketch of mirror.
7. Paste background.
8. The background is somewhat too short, so copy part of the image and use mask and gradient to extend it. As you see, I got rid of the moon too.
9. Paste columns.
10. Use mask and radial gradient to erase parts of the columns.
11. Use Color Balance, Hue/Saturation and Brightness/Contrast to adjust color of the columns.
12. Paste the lady inside the mirror and cut off unnecessary parts.
13. Paste the waterscape.
14. Use mask and radial gradient to erase parts of the water.
15. Brown background looks somewhat strange. Change it using Color Balance.
16. Time to erase what remained of background of the main lady. Use mask and gradient, eraser, and smudge.
17. Use Color Balance and Brightness/Contrast to adjust colours of her dress.
18. The mirror. Make a copy of its upper part and change the colours. Use Burn tool to make shadows if necessary. If you want to get more interesting colours, make new copy, change its coloring, and play with blending modes. Then, use mask and gradient to blend upper and bottom part into one mirror frame. [link]
19. Blue background looks monotonous. Make a copy of it, change colours, and use mask and gradient to make them look like one.
20. Lady in the mirror seems to be too large. Paste new version of her, erase background, and adjust colours.
21. Erase background of the mask. Play with new layers, new colours, and blending modes to make it fit with the rest of the image. [link]
22. Shadows now. Make copy of the lady and use Brightness/Contrast to make the image almost black. Then use Distortion to make it look as you want. Generally, the opacity would have to be lowered; I used 72%.
23. The image is somewhat dark… I used brushes to add beams of light and mist behind the mirror.
24. Change her eyes to something strange to add some macabre to the image. I used sunset by cempey, but some airbrushing would be as fine.
25. Play with the image if you feel so; maybe something is too bright, or you want something in different colour? (Wink)")
Now, that sounded really professional.")
Photoshop pseudo-tutorial, or rather expalantion how I made Planar Crossing [link] - really easy thing, it was not complicated photomanipulation. Just cutting images and adjusting colours.
If you download the thing, you will see animated gif. I made it just for fun ^^ The real tutorial is in text mode. I have Polish version of Photoshop, so if I translated names of the tools improperly, please let me know!
Also, I feel ill today, so pardon my mistakes.
1. Choose File->New Image and enter size. I worked on 2600 x 2900, but it’s absolutely not recommended, even if you have 2 GB RAM. 1600 x 1800 would be wiser choice.
2. Paste the lady and mirror so that basic layout is designed.
3. Paste upper part of mirror and use distortion to make it match other part. [link]
![[link]](http://xynatla.net/stuff/planar-crossing-tutorial/1.jpg)
4. Paste the mask and landscape inside the mirror. Use ctrl+x, eraser, mask and radial gradient and smudge to cut off background and make the edges smooth. Stamp (cloning?) is good for repairing the image if you happened to erase too much.
5. Do the same with upper part of mirror.
6. Cut off unnecessary parts of landscape and change layers order to get a rough sketch of mirror.
7. Paste background.
8. The background is somewhat too short, so copy part of the image and use mask and gradient to extend it. As you see, I got rid of the moon too.
9. Paste columns.
10. Use mask and radial gradient to erase parts of the columns.
11. Use Color Balance, Hue/Saturation and Brightness/Contrast to adjust color of the columns.
12. Paste the lady inside the mirror and cut off unnecessary parts.
13. Paste the waterscape.
14. Use mask and radial gradient to erase parts of the water.
15. Brown background looks somewhat strange. Change it using Color Balance.
16. Time to erase what remained of background of the main lady. Use mask and gradient, eraser, and smudge.
17. Use Color Balance and Brightness/Contrast to adjust colours of her dress.
18. The mirror. Make a copy of its upper part and change the colours. Use Burn tool to make shadows if necessary. If you want to get more interesting colours, make new copy, change its coloring, and play with blending modes. Then, use mask and gradient to blend upper and bottom part into one mirror frame. [link]
![[link]](http://xynatla.net/stuff/planar-crossing-tutorial/2.jpg)
19. Blue background looks monotonous. Make a copy of it, change colours, and use mask and gradient to make them look like one.
20. Lady in the mirror seems to be too large. Paste new version of her, erase background, and adjust colours.
21. Erase background of the mask. Play with new layers, new colours, and blending modes to make it fit with the rest of the image. [link]
![[link]](http://xynatla.net/stuff/planar-crossing-tutorial/3.jpg)
22. Shadows now. Make copy of the lady and use Brightness/Contrast to make the image almost black. Then use Distortion to make it look as you want. Generally, the opacity would have to be lowered; I used 72%.
23. The image is somewhat dark… I used brushes to add beams of light and mist behind the mirror.
24. Change her eyes to something strange to add some macabre to the image. I used sunset by cempey, but some airbrushing would be as fine.
25. Play with the image if you feel so; maybe something is too bright, or you want something in different colour?
Now, that sounded really professional.
Image size
484x550px 2.75 MB
© 2006 - 2024 Dhuaine
Comments29
Join the community to add your comment. Already a deviant? Log In
Wonderful! Thank you for sharing. 